The End of my Clone Wars
Clones can only carry you so far...
 |
So.... I made it into the Round of 8 of the Clone Wars tournament. My Boarding Trooper Clones would continue to roll on and hopefully through a massive wall of.... 4 Munificents!? Ok, we'll see about that, because they are ALL built as super tanks! That's right my next round I was paired against Beanicus and he brought 4 Munificent Frigates and zero starfighters. Without further ado, this report has been delayed long enough. Let's hop into it.
Beanicus Fleet
 |
| Oh, you shot him...well, let's just say that didn't happen |
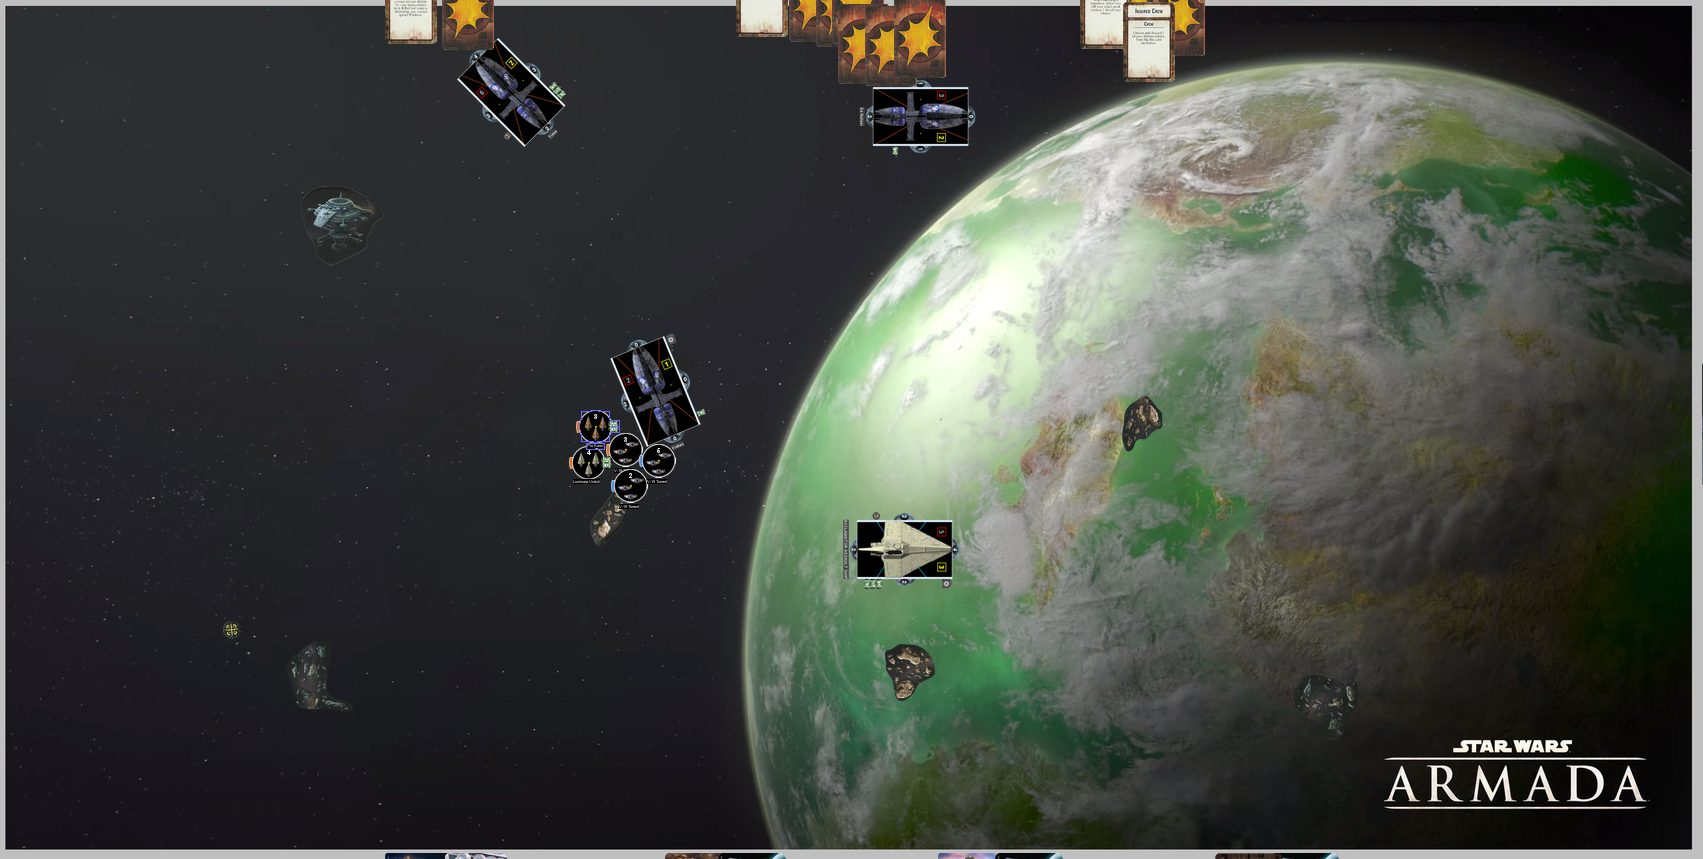
My list
 |
| Point and remove defense tokens |
The Game
We were both tied at 400 points so rolled for who gets to choose/have initiative. I won and after some debating elected to go second as I was worried if I gave him objectives he could kite away from my ‘Clams and I'd be in no shape to box a Munificent in and kill it. At this point I had also primarily played second player and was more comfortable with the list as Second Player. Sometimes that level of comfort and experience is more important than the optimal choice, all other factors being relative.
Beanicus elected to play my Minefields objectives so I got to set the all obstacles and mines out. I tucked a station in the corner and built a wall of mines around the corner so he'd have to come the long way around past obstacles to get to me or plow through mines to start the shooting earlier.
He chose to plow through and use his magnificent Munificent Engineering commands to get out of any trouble he was in. I built my echelon Clam wall in the corner with Nevoota (blue) towards the center and Bail closest to the edge, while he placed out 4 Muni's across from me.
 |
| Setup |
Round 1
 |
| End of Round 1 |
Round 2
Another thrilling round of tension building here in Round 2. The Muni's mostly fixed themselves from their mine impacts and turned towards the right side of the board at speed 2. Kraken (2nd from the right) slowed to speed 1 to not land on an asteroid. There was some pretty marvelous navigating here as well, to not overlap each other or any obstacles. Those Muni's are slow but maneuverable, and Bean knew what they could do.
Meanwhile, my 'Clams continued their charge and did their best to not get to fully enmeshed in double arcs. Eventually, their goal was to close to close range for their Boarding Troopers. My squadrons shuffled forward to help supplement the fire next turn but not get flaked hard and then run back to the station for healing after some Cluster Bomb action.
 |
| End of Round 2 |
Round 3

Bean started with Tides of Progress on the far right, gained a repair token and threw 3 damage into Nevoota Bee. She was the furthest right and most exposed to ALL of the attacks. To keep her tokens for those attacks I used Implaccable to take 2 damage so she only took 1 shield damage. Then Tides did those fancy Munificent moves and turned into the left side of the board to flank my ‘Clam line and eventually to help cleanup later.
I used my one and only pass token, so the left most Muni activated next and laid into Nevoota with her double arc. So I knew this wasn’t going to go well for her. Two shots with Kraken's help dealt 4 and 3 damage, got Nevoota to exhaust all her tokens, stripped her side and rear shields and landed Faulty Countermeasures, so I wasn't getting to refresh my defense tokens at the end of the round. Painful but not unexpected for Nevoota. Then the Muni shuffled forward and stayed out of close range of ALL of my 'Clams. Only by a millimeter but neither Nevoota or Implacable had her in range unfortunately.
Since I didn't have any good BT options for this round that I could have follow-on attacks to a tokenless target, I elected to activate Bail. He revealed a squad dial and tossed Anakin, Luminara, and Plo for 3 damage between them all BUT a fantastic 3 damage salvo and a perfect cluster bomb attack removed Anakin immediately after his first shot. In hindsight I still think I lead with Anakin because his 6 hull had the greatest chance to survive the cluster bombs. Obviosuly the Delta-7's can't go first cuz Cluster bombs can just kill them and I don't think V-19s would've drawn the cluster bombs out. Especially since there was no chance of me killing the ship before it got to use them. If I hadn’t used Implacable earlier, Anakin could have been saved from the Salvo but I was more worried about saving 1/3 of my ships rather than little ‘ole Ani. 3 red ship dice did 3 damage and snuck onto the hull of the Muni. Then Bail advanced and instead of ramming i shot straight ahead to try to get into close range of something for Boarding Troopers next turn.
Next, Sa Naloor activated, passed 2 shields to the basic Muni, threw 3 damage with a crit on an obstructed attack into Nevoota's unshielded side and drew Compartment Fire. So now Nevoota couldn't even ready my tokens and she was down to 3 hull. Sa Naloor then darted forward directly ahead of and into close range of Nevoota.
Nevoota then activated and with her turn 1 repair token and Bail Engineering dial removed those 2 nasty crits and then slung the V-19s into the battle. I chose not to use my Boarding Troopers on Sa Naloor because I wasn't planing on shooting her and wanted to save them for next turn for a bigger impact when those tokens would be forced to be spent. That being said, using BT and my external racks on Sa Naloor could have put enough pressure on her to disengage or at least worry about fixing herself versus helping others. Especially since I traded 4 black dice to get an extra 3 red on a double arc.
Nevoota got rid of 5 shields and left the basic Muni at 2 hull after her double arc but had to burn her redirect on a crit salvo. Then with a Bail Nav Command she darted out of the double arc but barely into medium range of Kraken. I probably should’ve trundled ahead and taken an obstructed double arc shot totaling 3 dice instead of a single 4 die attack.
Kraken activated and threw 4 damage and an accuracy to rip Nevoota's front shields away and land Coolant Discharge (no double arcs at ships). Then took a pot shot into Bail and turned into the fray at speed 1.
Implaccable activated, did min red dice damage into the Basic Muni and then moved forward at speed 2 into close range and blocked in future Boarding targets (mainly the Basic Muni). Though life wasn't looking to good for Nevoota as she only had 3 shields. She needed to live through this next series of attacks to get her Boarding Troopers and External Racks off, then it'll be a worthwhile trade as Nevoota was usually traded to kill one and maim another ship so far.
 |
| A smoking Acclamator drifts in the void |
Round 4
Sa Naloor activated and with the help of Implacable needed both of her shots to finish of Nevoota Bee, though a ram would've worked if the dice failed after the first attack. I could argue for not using Implacable to save damage on her, except I knew I had a repair dial coming to bring my shields up to max and Sa Naloor would've shot the front of Implacable anyway if Nevoota had died on the first shot. Also, Coolant discharge stopped a second Salvo from happening so that was unfortunate as the accuracy was needed and rolled for the Brace both times. Sa Naloor then ran straight ahead at speed 2.
Bail activated next and with the help of Plo, Luminara and his external racks was barely able to kill the basic Muni. A long range front arc got Sa Naloor to use a token as an evade and setup some Boarding Troopers from Implacable. Then Bail steered towards the asteroid field and Kraken's flagship.
Kraken activated next and sent some shields over to Sa Naloor then laid into Implacable. some mean shots and salvos left Implacable with a single fore shield and no redirect. Also, a red Brace and Salvo. Then Kraken inched forward into a marvelous double arc for top of the next turn into Implacable.
Next up was Implacable and the choice of who to use Boarding Troopers on. I had a front arc shot into the side of Sa Naloor and needed 9 damage through there to kill her. Plus V-19s backing me up in the squad phase. Or I had a front arc shot into Kraken with about equal shields. This was probably my main mistake (besides maybe not taking first player) and I got a little greedy. In hindsight I should've committed to pushing all the damage into Kraken as killing him would've won me the game by a slim margin.
Instead, I used the Boarding Troopers on Sa Naloor, removed the redirect and left an exhausted Brace and Salvo. I was hoping to roll enough damage I can force token expenditure and then pick Sa Naloor off with red dice as they limp away. After rolling my dice, my massive close range attack did a whopping 4 damage, but I didn't have much dice fixing so that's what happens sometimes. Implacable also fixed itself with a dial and token for major frontal shields and rammed to stay in place.
Finally, Tambor activated and plinked away those shields I just regenerated and then did the super sloopy Muni speed 2 move to end in a double arc on Implacable. The V-19s had an unshielded side arc with no redirect available and they managed a single hit. So Sa Naloor was going to live. So much for my gamble.
 |
| Ships are dying |
Round 5
Top of the round Sa Naloor activated, moved her shields around to cover her exposed arc. Then shot a crit to the hull for a card that didn't effect gameplay but a great salvo back forced Sa Naloor’s brace to be used. Then Sa Naloor dodged behind Tambor and into long range.
Implacable activated and used the last of Bail's help to repair his side shields, then threw some damage into the front arc of Kraken and finally dodged into the side of far side of that Muni at speed 3. I sped up since it was his best hope to live, though Kraken and Tambor had yet to activate.
Kraken activated and a brutal side arc barrage and exchange left them both at 5 hull. In my mind it looked something like this. With almost similar results.

Kraken then missed on it's LTT flak shot on a Jedi and rammed to stay in place.
Bail then activated and finally used his Boarding Troopers on Kraken and removed the exhausted Brace and left a red redirect and Salvo on Kraken. Bail unloaded 6 damage into the side of Kraken and after tossing the redirect, the Muni had 3 hull left. But I had a double arc, 2 reds and 1 black for 3 damage and no mitigation from the Muni. And a ram if I needed it to finish him off. There was a real chance here. And... I managed to get a single hit. Not even the ram could kill him. So then Bail charged ahead and out of the line of fire hoping V-19s and some squadron shuffle into Round 6 could finish off Kraken.
In hindsight I should've rammed Kraken at speed 2 and landed on the asteroid. That would've left him at 1 hull and while not killed him at least given me a fighting chance to do it next turn and maybe a double arc even if it would be after he got shields slung to him. It would’ve been 1 less dice that had to have a hit.
Tambor activated next flakked a V-19 down to 2 hull and sent Implacable down to 2 hull as well. Then Tambor pointed to the top of the board and swung her flak batteries to bear. Finally, the 2 V-19s in range brought down the forward shields of Kraken and remained in place to be overlapped next turn.
 |
| Feeling close |
Final Round
Kraken obviosuly activated first and annihilated Implacable and then flaked a V-19 to death so I used RHD to revive it. This left it activated however so it wouldn’t get to shoot later. Then Kraken limped straight ahead and prepared to wither the storm in my attempt to kill him.
Bail's side arc stripped the 2 remaining shields from Kraken and then he lurched forward and into a mine that didn't matter. Both remaining Muni's tried to flak but couldn’t kill anything, though 2 shields got tossed onto Kraken's exposed flank that hosted most of the fighters and assured its survival.
And now we were in the squadron phase. I had 4 fighters in range and Kraken had 4 hit points to effectively get through, so long as everyone hits with black dice and Jedi rerolls, there was a chance. My first V-19 spun up it's cannon and fired off into deep space for a clean miss so I couldn't kill Kraken and we called the game. The current score was sitting at 202-91 but if Kraken had been killed it would've been 212-202. Though there was a flak salvo and Cluster Bombs still to be used, so almost assurdedly the 3 hull V-19 would've died and those 13 points would have swung it back to Bean. Though we'll never know.
 |
| End game state |
Final Result
Like I mentioned 202-91 with the well deserved victory going to Beanicus. As an elimination round it really did not matter MOV just the ultimate winner. For the unaware Beanicus would go on to ravage some more Republic fleets in the next 2 rounds and win the entire Clone Wars Tournament. So if nothing else, I can say I was eliminated by the champion.
There a couple of factors/choices that could’ve changed the course of the game. The first being my choice to go second. Without knowing objectives it’s pure conjecture on how the game would’ve played out, but with Bail Nav dials (probably 3 Nav and only 2 Engineering) Boarding Trooper ‘Clams could’ve delayed enough to jump into a good double arc on at least one or two Munificents and then scurried out of double arcs as well. This would’ve required some precise sequencing and activations but could easily have happened. Again, pure conjecture with hindsight but it’s something to consider if you, my dear reader, consider a similar list.
The second was my choice to get greedy and gun for Sa Naloor with Implacable instead of focusing on Kraken. There was a chance but a small one of killing Sa Naloor. A better choice would’ve been to board Kraken and pour fire in to either force some tokens to be discarded before Bail followed up OR just push some damage and maybe a crit through the shields to prep Kraken for Bail’s follow up. Either way Implacable probably dies but then the squadrons would not have been killed with cluster bombs and I would’ve won by a slim margin.
After 5 games and some random practices against friends I thoroughly enjoyed my Clam Bam list. It certainly wasn’t 100% optimized and I never used CNO a second time on Implacable, but there are some aspects that I think can stay competitive even after the Venator/Pelta come out and the faction is more competitive against their Civil War Era peers. I’ll write a more thorough after action report of the whole list and what parts I could improve and will keep or incorporate into my future Republic lists.
Otherwise, 4 Muni’s is a fun list and with cluster bombs and LTT flak might lose a ship to dedicated squadrons but will certainly have the staying/engineering power to muscle through the knife attacks for long enough to kill some carriers.
Finally, since I’m publishing this after the tournament is over, the goal being to preserve the surprise of Beanicus’ list, I can congratulate him on toppling both MandolorianMoose and JJ’s Juggernaut to claim the crown of the Clone Wars Tournament Champion. I’d also like to thank Green Knight for assembling the entire thing and keeping it running the whole time. It was a fun event and a good way to see lots of different Clone Wars stuff being tried.


